

Servicing Brass Instrument Tuning Slides
by Jeff Smith
Servicing brass instrument slides can be rewarding. With only a few affordable supplies, some basic knowledge, and a little time you can greatly affect the playing condition of your brass inventory stretch your repair budget, and have fun getting your hands dirty at the same time!
Examine
Stuck slides on brass instruments are usually the result of neglect: infrequent cleaning and lubrication and sometimes, improper lubricants. Also examine the slides and connected tubing for dents, as well as for loose braces and solder joints. Don’t try to free slides that have any of these issues or slides that are adjacent to loose braces. This could lead to further damage. Please refer these jobs to a professional repair shop.
 When examining a stuck slide, note if one side of the slide moves while the other seems stuck. This will more often be the case on slides with greater distance between them than on narrower slides. See for example a trumpet main tuning slide as opposed to a first valve slide.
Before you pull, oil.
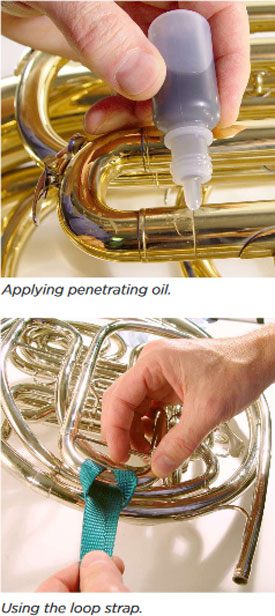
Though you may be able to pull some stuck slides without the help of “penetrating oil”, I recommend that you take advantage of its properties. This special oil is made to creep into tight places and help break the cement-like bond of mineral deposits, and it provides lubrication to the tubes, which helps when pulling long slide tubes.
For the oil to work best, it is helpful to warm the tubing that is stuck together. This can be done with a commercial hot air gun or even a blow dryer. Concentrate the heat at the area of the tube that you want to draw the oil too. Put a couple drops of the oil at the joint of the inner and outer tubes. If you can, also apply a few drops from the inside (through a valve port for example).
The heated part will draw the oil to affected areas. You may need to repeat this if a slide does not easily come free on the first attempt. Keep exterior surfaces clean by wiping excess oil off of the instrument. It is sometimes necessary to let the instrument sit for a time, allowing the penetrating oil time to do its work.
Helpful tools.
The most basic and useful helper in pulling stuck slides is the loop strap. To use the strap, wind the strap through the crook and then through itself as shown in the photo. This simple way of holding a slide will keep it from falling to the floor when it pops loose (and it may). You may tug on the strap by hand, or hold the strap in a bench vice (tugging on the instrument), or use it with the handle that is in the J.L. Smith Slide Service Kit.
Other helpers: Crook Pins and Plates
In the aforementioned kit are a crook pin, and some crook plates. These are made to fit the inside of various sized crooks to use as knock out tools. The pin is sized to remove very tight slide crooks such as the valve slides on trumpets (larger crooks would be damaged by this tool). The strap won’t often fit these small slides. (The crook pin.jpg)(Using the crook pin.jpg)
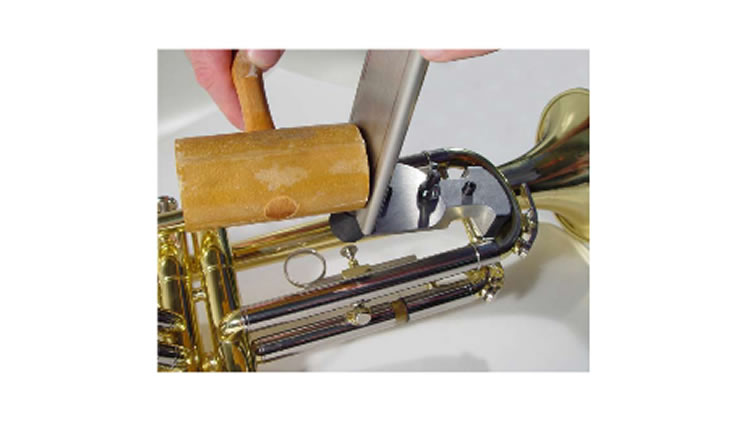
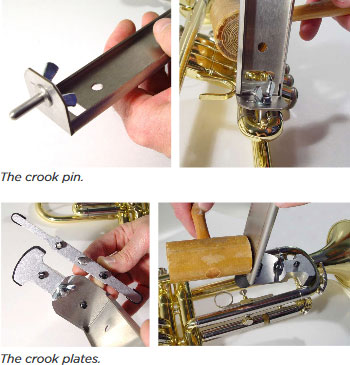 The plates are used for larger slides, and the curvature fits against the crook with proper support. (Crook plates.jpg) The pins and plates are mounted to a handle that is tapped upon. Tapping with the hammer supplies shock to the parts (rather than force) and the shock and vibration breaks the lock between the slide tubes. (Using crook plates 1.jpg) (Using crook plates 2.jpg)
Occasionally, you may find a slide that the methods described cannot free. When this is the case, it may be necessary to unsolder and disassemble the slide to pull the tubes, and may even require rebuilding the slide with new tubes. These are certainly jobs for the professionals.
Cleaning
Before reassembling the instrument, clean the slide (both inner and outer). There are a number of ways to do this, but in a band room, it would be helpful to brush all of the tubing with a good stiff nylon slide tube brush, and a cleaning snake for the crook. Use warm (but not hot) water and a degreasing dishwashing detergent such as Dawn. If you are servicing slides that have not been frequently cleaned, you may need to have the instrument commercially cleaned and then follow with regular cleaning and lubrication. This is particularly true if there are hard deposits on the slides.
Commercial repair shops will employ various chemicals to emulsify (to remove grease), decalcify (to remove deposits), and surface treat the brass. Also a growing number of shops have brought ultrasonic cleaning online. And after either a chemical or ultrasonic process often the technician may use additional methods to produce a uniform surface finish to both the inner and outer surfaces of the slide tubes. The surface finish will have some bearing on the feel of the slide as well as how it holds lubricating grease.
Assembly
Lubricate the inner slide tube with a quality commercial slide grease of your choice. Apply the grease around the circumference of the inner slides then, individually work each inner slide into its outer tube with a twisting-pushing-pulling motion. This will insure that both the inner and outer slide tubes are uniformly covered with a thin layer of grease. Next, insert the slide into playing position and wipe off the excess grease. When storing instruments for a long period of time, pull each slide slightly so that later you can either push or pull the slide to free it up.
Establishing a regular maintenance routine and schedule for servicing the slides will help keep these vital aspects of your brass instruments in top shape and help stretch your repair dollars by reducing the need for professional repair work. And you may wish to enlist and equip a conscientious student to help with this work.