

Clarinet Care
Clarinet Care
To keep your instrument in the best possible condition please follow these suggestions:
Assembly
Start with checking the cork grease on your tenons. When properly used, cork grease should allow you to assemble your instrument without excessive force. A tenon cork should not have pieces missing, and it should not fall out or wobble in the tenon when the instrument is assembled.
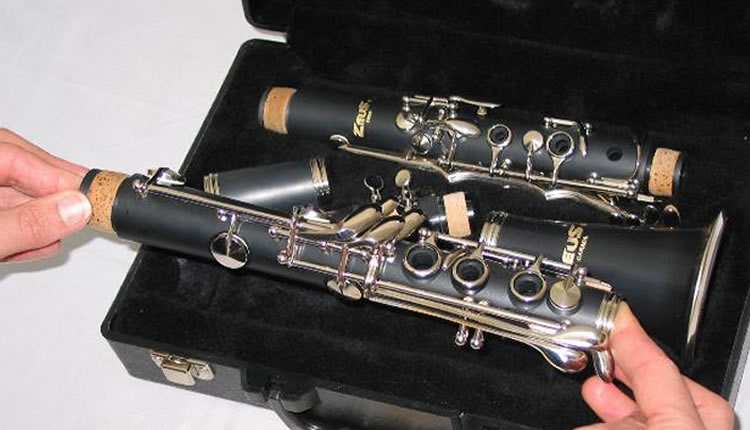
First assemble the bell to the lower joint. To do this hold onto the bell (anywhere), and hold onto the lower joint by holding the F/C and E/B pads closed (the lowest open keys). Your hand should wrap around so that you are holding up to two closed keys and two open keys (held in the closed position). This will keep your hand away from the key parts (mechanisms) that bend easily. Once the proper hand positions are determined, assemble using a slight twisting motion.
Next assemble the upper joint to the lower joint. Hold the lower joint as you did in the last step, then hold the upper joint at the very top, and you should then be holding only closed keys down and greatly reduce the risk of bending keys. Assemble again with a gentle twisting motion. To properly align the instrument please line up the center posts of the two joints (The Bb bridge key post to the F# ring key post). If you have an instrument that will not twist together without holding the bridge key down on the upper joint do your best to hold the instrument in near playing position when assembling the upper and lower joints. Be careful not to put pressure on any keys that will bend easily.
Now assemble the barrel to the upper joint, still holding the upper joint at the top, hold the barrel any way and twist gently to assemble.
Finally assemble the mouthpiece to the barrel. The flat part to the mouthpiece (the face) should line up with the register key. After the mouthpiece is on the instrument then put the reed and ligature on.
Harmony clarinet assembly
First grasp the bell bow in the palm of your hand, holding the low Eb key closed, twist gently until assembled, lining the center of the bell with the center of the tone holes of the lower join. Check that the Eb key closes at the same time as the E/B and F/C (lowest open keys).
Hold onto the body of the instrument as carefully as possible to avoid bent keys, then hold the neck in the other hand and gently assemble and tighten the neck screw. You should never use lubricant on the metal neck joint (i.e., cork grease, Vaseline, etc.). If you have difficulties assembling the instrument easily, please have your instrument repaired as soon as possible.
Then install the mouthpiece with the face down, and then install the reed and ligature.
Maintenance
Use cork grease as little as possible, but make sure you use it when you need it. To apply it properly you must rub the grease into the cork. Do not use chap stick. Do not leave your reed on your mouthpiece. The reed can cement itself to your mouthpiece and collect many germs. Occasionally wiggle your thumb rest to see if it is loose, tighten if necessary. The thumb rest supports the whole instrument and it is very important that it remains snug to the body.
Use an absorbent (cotton) drop swab to clean out the moisture before you return it to its case. Wooden instruments must be swabbed every time they are used. If you own a “shove-it” do not put it in your instrument until you have used a drop-swab. The “pad savers” only save the pads if you remove the moisture from the instrument first. Otherwise more harm is done because the moisture is directly next to the pads. Fuzz also gets everywhere, which can prevent pads from sealing and keys from moving.
When a wooden instrument has loose socket rings it is an emergency. Do not attempt to assemble the instrument until they are repaired. You can crack your instrument by assembling it with loose rings.
Please do not use lotion silver polishes on your instrument. The lotion can make a mess and harm your instrument. If you use a treated polishing cloth for any finish make sure it is for the proper finish. An example of why not to use the wrong cloth is that raw brass cloths can scratch and harm lacquer. One of the best ways to keep your instrument finish looking nice is to wipe off your fingerprints after every use. A clean non-treated cotton cloth works well for this.
It is recommended that an instrument is taken to a professional repair technician at least once a year for general maintenance and cleaning. Doing so may prevent costly repairs that arise from lack of professional repair attention. A qualified technician can often discover a problem that you have learned how to overlook, play through or are not aware of.
Case
Do not set anything on top of an instrument in its case. This means sheet music! Damage occurs easily when items are set on the instrument and the case closed. Make sure the case is secure. Check all the hinges, latches, and handles to see if they are solidly fastened to the case and they close the case securely. Make sure that the instrument does not move around inside the case. Please do not sit, rest feet on or otherwise apply pressure to the outside of an instrument case. This can damage your case so that it does not properly protect the instrument. Carry the case so that if it does open, it will open toward your body, not the ground.
Emergencies
In an emergency, please avoid any adhesives. Use dental floss, Teflon (plumber’s) tape, or something that will be easily removed when the instrument is properly repaired. Superglue will make a mess if a solder joint breaks. Tape adhesive can create more of a mess than the temporary repair is worth. A word of caution, rubber bands can eat silver plate, so it is best to avoid any use of rubber bands on silver instruments. Never use pliers or hammers on your instrument. Improper use of household tools is a common cause of unnecessary damage to an instrument.
This information is provided for the benefit of your instrument by:
Windy’s Winds
Brass and Woodwind Repair
Windy and Benjamin Shaffer
559 West 200 North
Cedar City, Ut 84720-2406
867-8998
Toll-free (888) 773-0104
E-mail windyswinds@napbirt.org